-
Click Appointment Manager located in the bottom-left corner of the screen.
-
Click the gear icon shown at the top-center of the window that appears.
-
You are now in Appointment Availability Settings. It is suggested that you configure appointment settings (length, advance notice, etc.) before creating Availability. Information about how to do so can be found in the overview of appointment settings.
-
Scroll down to the “Recurring Availability” heading.
-
Click the red New button found in the “Current and Future Availability” box.
-
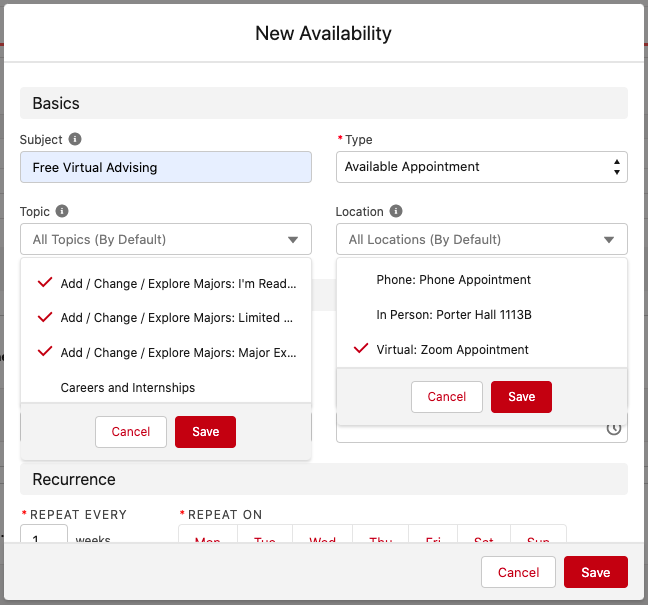
Give the Availability a subject. Note that having the word “FREE” appear anywhere in the subject will mean that your advising blocks will be treated as “Free” in your Google Calendar (if you are using calendar sync). If the time is not booked by an appointment it will allow colleagues to schedule other meetings during that time. An example is shown below. You might also use “Free In-Person Advising” or “Free Virtual Advising” to match your Location.

-
Designate the type of Availability using the drop-down menu under “Type.”
-
Select “Available Appointment” if you are creating an Availability to allow students to schedule appointments with you during.
-
Select “Drop-In Hours” to set aside time for Drop-In Advising. “Drop-In Hours” creates a block of time in which any student can come by for advising. When a student selects a time designated as “Drop-In Hours,” they are presented with an on-screen message directing them to your physical office location during that block of time. Because of this, the Drop-In Availability does not allow the student to schedule an appointment within those hours.
-
“Group Availability” is a new option which allows for multiple students to sign up for the same appointment slot. This functionality is currently in beta testing and advisors are encouraged to avoid this option for now. Please consult with your TerpEngage Steering Committee representative or a member of the TerpEngage Core Team if you wish to receive specific training on how to use Group Availability.
-
Select a Topic(s) for the Availability in the Topic dropdown menu. Select as many topics as you wish to offer during this time slot. If you don’t select a topic, the system will convert the default “All Topics” to “General Advising.” Since not all topics are applicable to all advisors, please choose specific topics in coordination with your advising unit. The current list of topics / subtopics was selected by the TerpEngage Steering Committee and the University Career Center. In the screenshot below, this advisor will have Availability for all three subtopics under Add / Change / Explore Majors, but they will NOT offer the Careers and Internships topic.
-
The Add / Change / Explore Majors topic has three subtopics which appear in-line with the primary topics (as seen in the image above). You may choose any/all of them. Careers and Internships, on the other hand, has no subtopic.
-
Students can schedule an appointment via two different workflows:
-
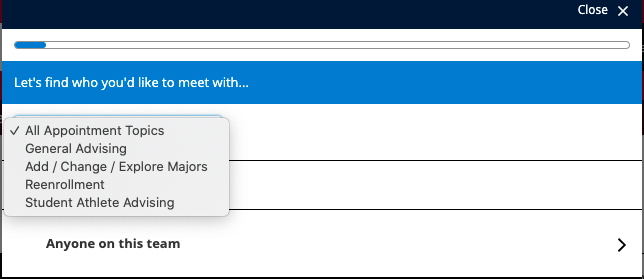
Topic -> Advisor -> Time -> Location: In this scenario, only the topics offered by any advisor on their Success Team will appear as options as shown in the screenshot below.
-
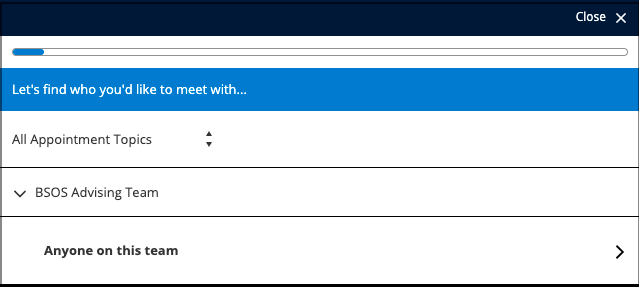
Advisor -> Topic -> Time -> Location: In this scenario, the student doesn’t select a specific topic (Note the text “All Appointment Topics” in the screenshot below). If the selected advisor doesn’t have availability for a specific topic, the topic will not appear for the student. The student will need to click Back to select a different advisor or a specific topic.
-
-
-
Select a Location(s) from the Location multi-select menu. If you do not make a selection, it defaults to all locations.
-
Complete the rest of this window according to when you want the Availability to be.
-
Though you can select multiple days at once, it is suggested that you create unique recurring Availability for each day of the week (e.g., only selecting one day in this window at a time) because each Availability you create is limited to a certain number of blocks of time. Additionally, creating separate blocks of daily ability (ex: Monday 12pm-4pm, Tuesday 12pm-4pm, etc.) creates more flexibility when editing your Availability later.
-
An example of creating Availability day by day would be creating one recurring Availability to repeat every 1 week on Monday from 12pm-3pm, then creating a new Availability set to repeat every 1 week on Tuesday from 12pm-3pm.
-
-
Click Save to save the Topics, Location, and Availability you just created. Be sure to also click Save at the bottom of the Appointment Availability Settings page.
-
Once you have created an Availability, you are able to clone it, edit it, or cancel it. Cloning availability allows you to easily replicate multiple days of Availability.
Last updated on
Sep 26, 2022